2025-02-27 - Another i/o Error for storage01
Another disk issue on storage01 cropped up, and I haven’t even finished documenting the fault that happened last February 21, 2025. This time, it’s sdb1 acting up. Thankfully, I was able to resolve the issue without any data loss, but it was a close call.

Incident
- I/O Error on
/dev/sdb1during scrub operation.
Severity
- High
Impact
- Data corruption on
/dev/sdb1, potential data loss sdb1is one branch of the mergerfs volume served bystorage01, losing access tosdb1effectively halves the usable capacity of the Network File System
Affected Systems
storage01
Timeline
- 2025-02-27: I/O errors detected during snapraid scrub operation.
- 2025-02-27: XFS filesystem on
/dev/sdb1shuts down due to log I/O errors. - 2025-03-01: Troubleshooting steps initiated to identify the root cause.
Logs from dmesg
    [145729.843018] sd 1:0:0:10: [sdb] tag#84 Sense Key : Aborted Command [current]
    [145729.843019] sd 1:0:0:10: [sdb] tag#84 Add. Sense: I/O process terminated
    [145729.843021] sd 1:0:0:10: [sdb] tag#84 CDB: Synchronize Cache(10) 35 00 00 00 00 00 00 00 00 00
    [145729.843023] I/O error, dev sdb, sector 0 op 0x1:(WRITE) flags 0x800 phys_seg 0 prio class 2
    [145729.850513] sd 1:0:0:10: [sdb] tag#201 FAILED Result: hostbyte=DID_OK driverbyte=DRIVER_OK cmd_age=0s
    [145729.850517] sd 1:0:0:10: [sdb] tag#201 Sense Key : Aborted Command [current]
    [145729.850518] sd 1:0:0:10: [sdb] tag#201 Add. Sense: I/O process terminated
    [145729.850519] sd 1:0:0:10: [sdb] tag#201 CDB: Synchronize Cache(10) 35 00 00 00 00 00 00 00 00 00
    [145729.850540] I/O error, dev sdb, sector 3909372392 op 0x1:(WRITE) flags 0x9800 phys_seg 1 prio class 2
    [145729.850549] XFS (sdb1): log I/O error -5
    [145729.850569] XFS (sdb1): Log I/O Error (0x2) detected at xlog_ioend_work+0x6e/0x70 [xfs] (fs/xfs/xfs_log.c:1378).  Shutting down filesystem.
    [145729.850749] XFS (sdb1): Please unmount the filesystem and rectify the problem(s)
Detection
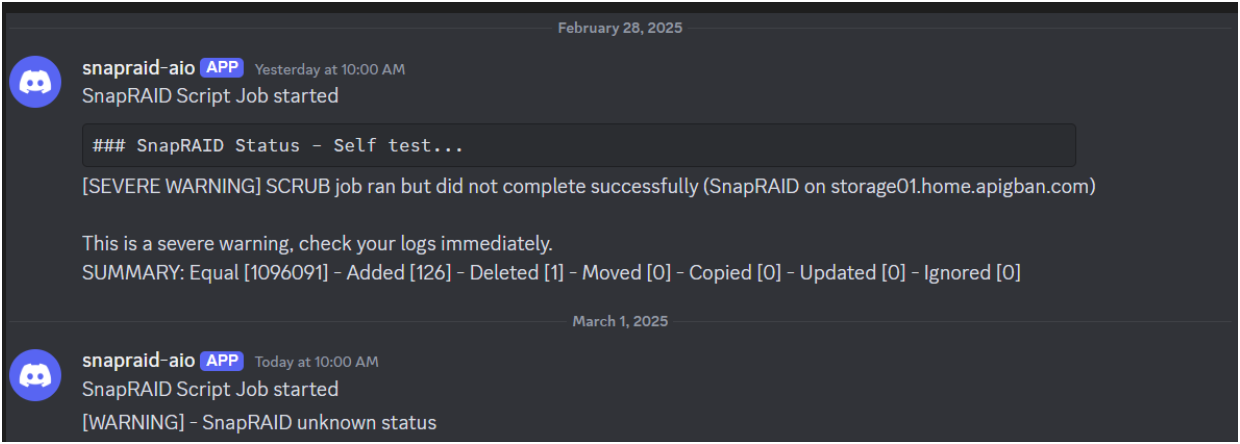
Alert from Discord
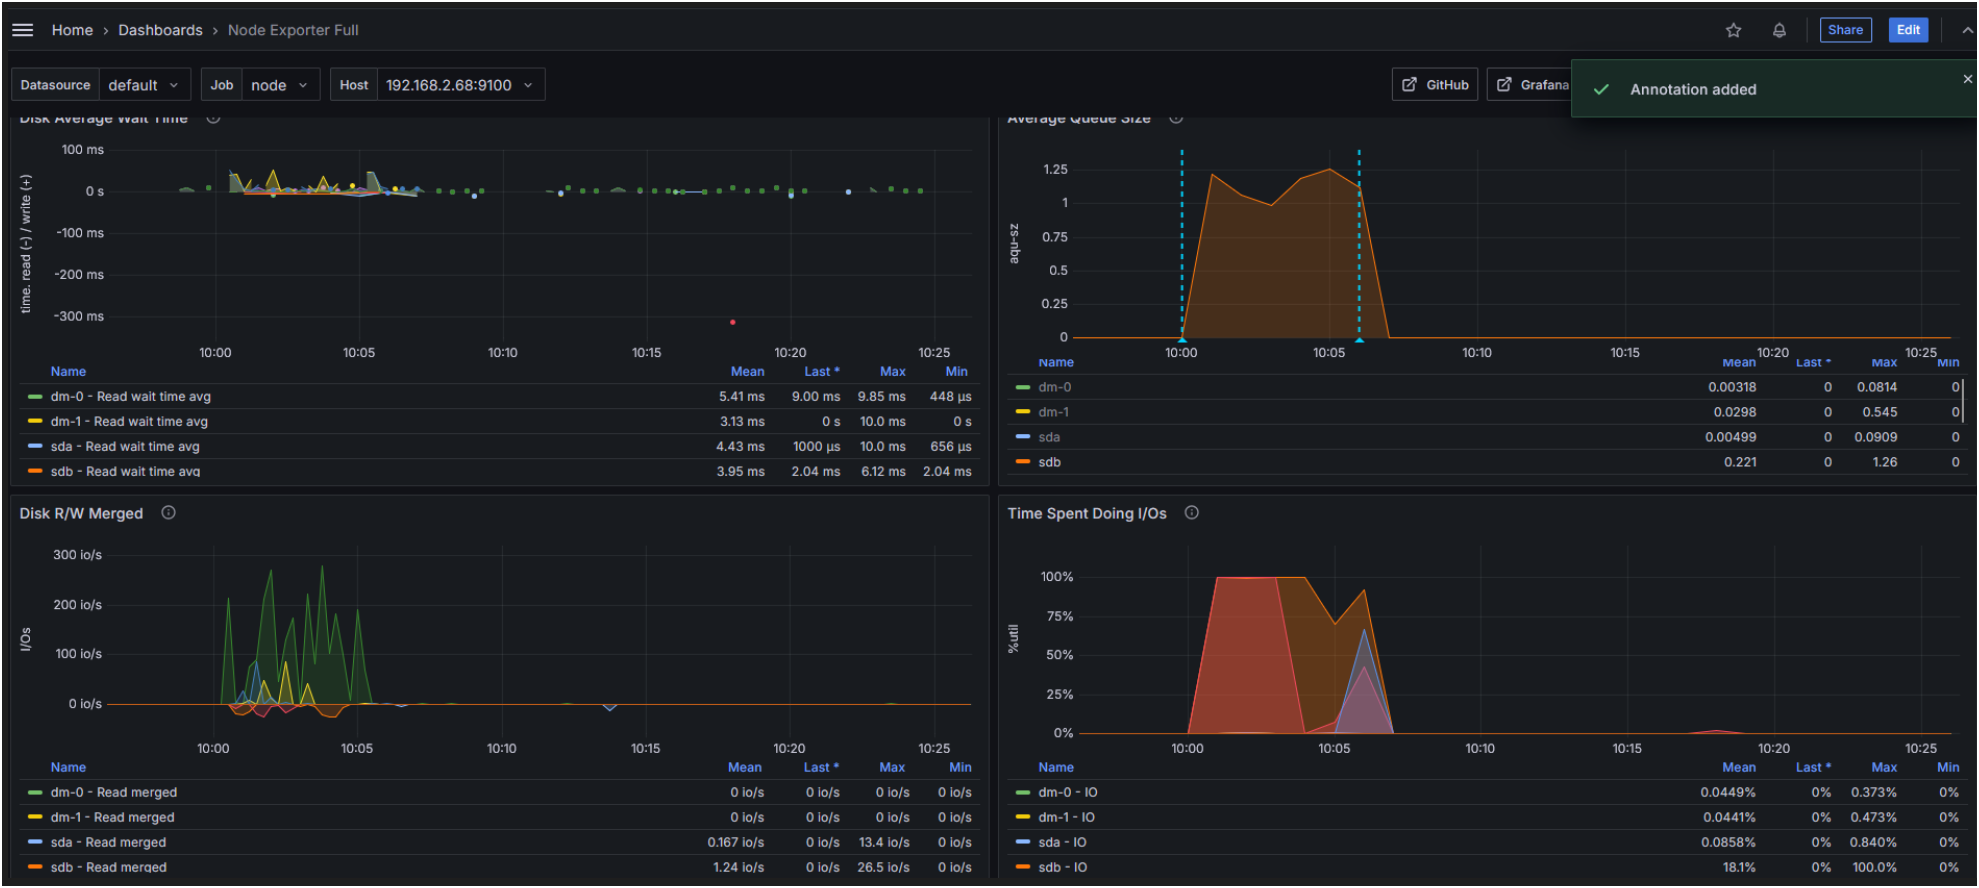
Disk Metrics during fault
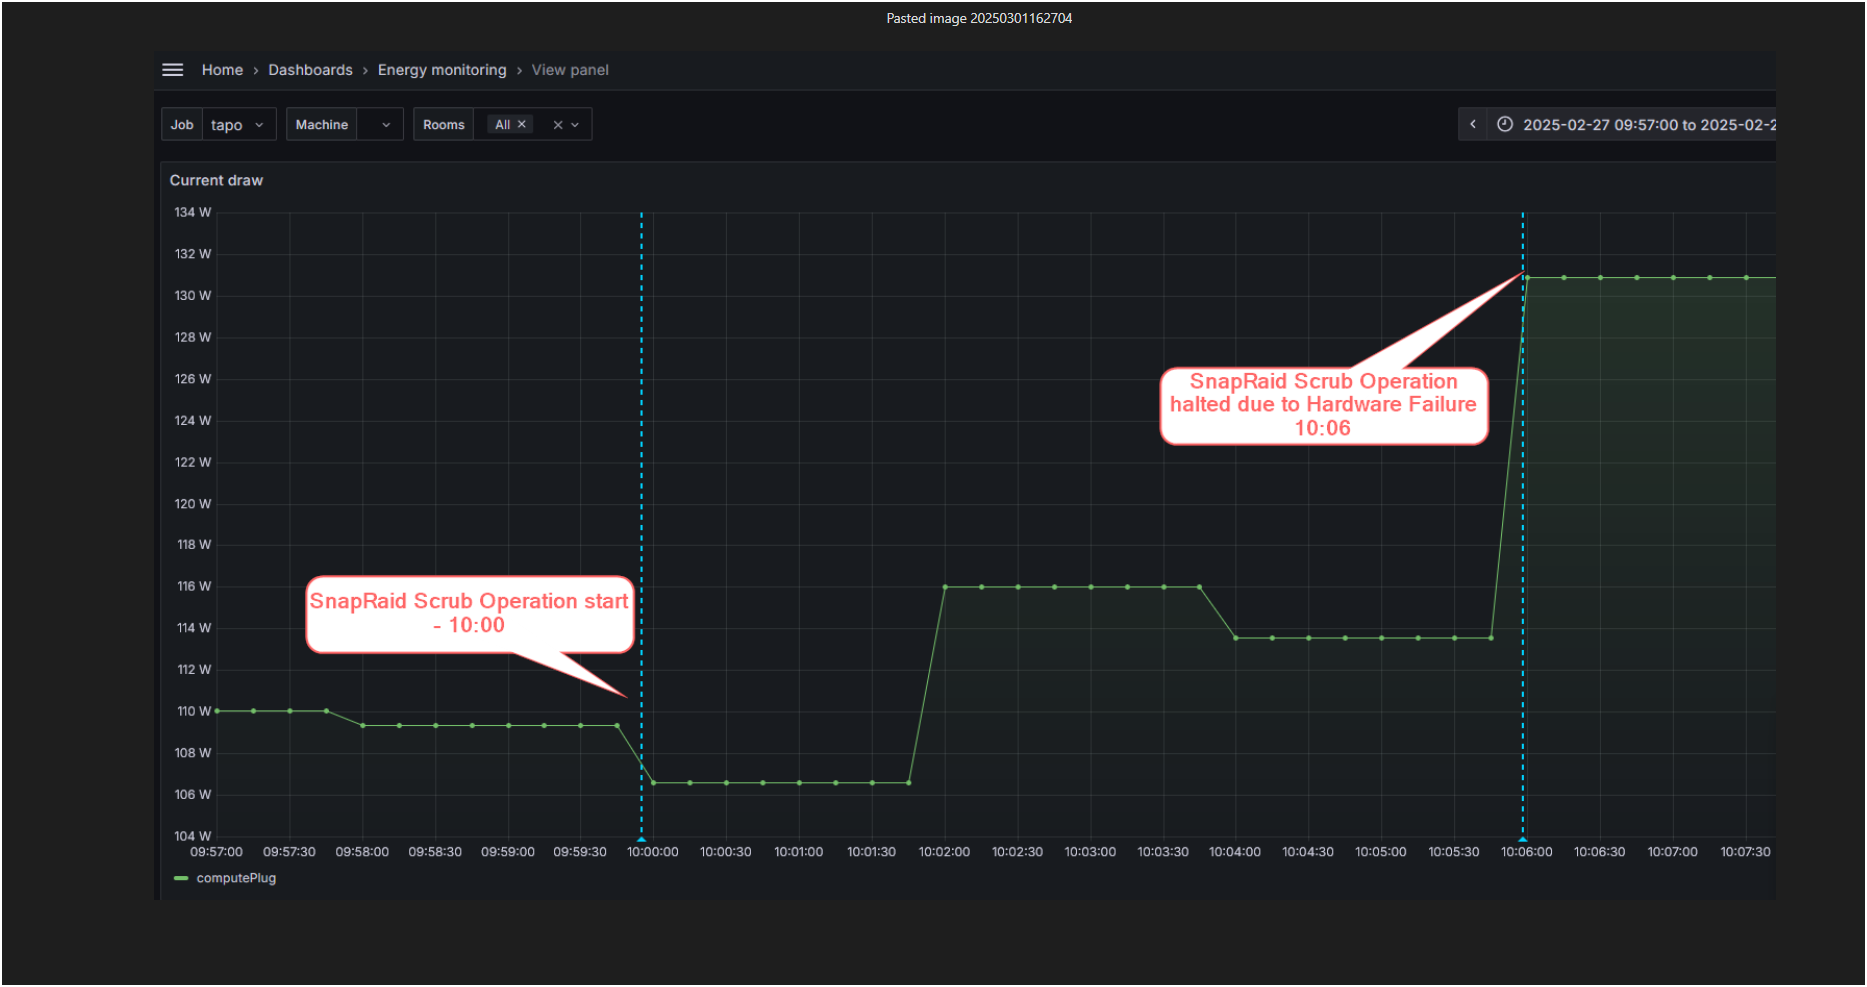
Server Power Consumption during fault
Troubleshooting Steps
I started by trying to unmount the affected filesystem, but both umount /dev/sdb1 and umount /mnt/data01 failed because the device was busy. I then tried to see what resources were using the disk with fuser -a /mnt/data01 and lsof /mnt/data01, but those commands failed due to I/O errors.
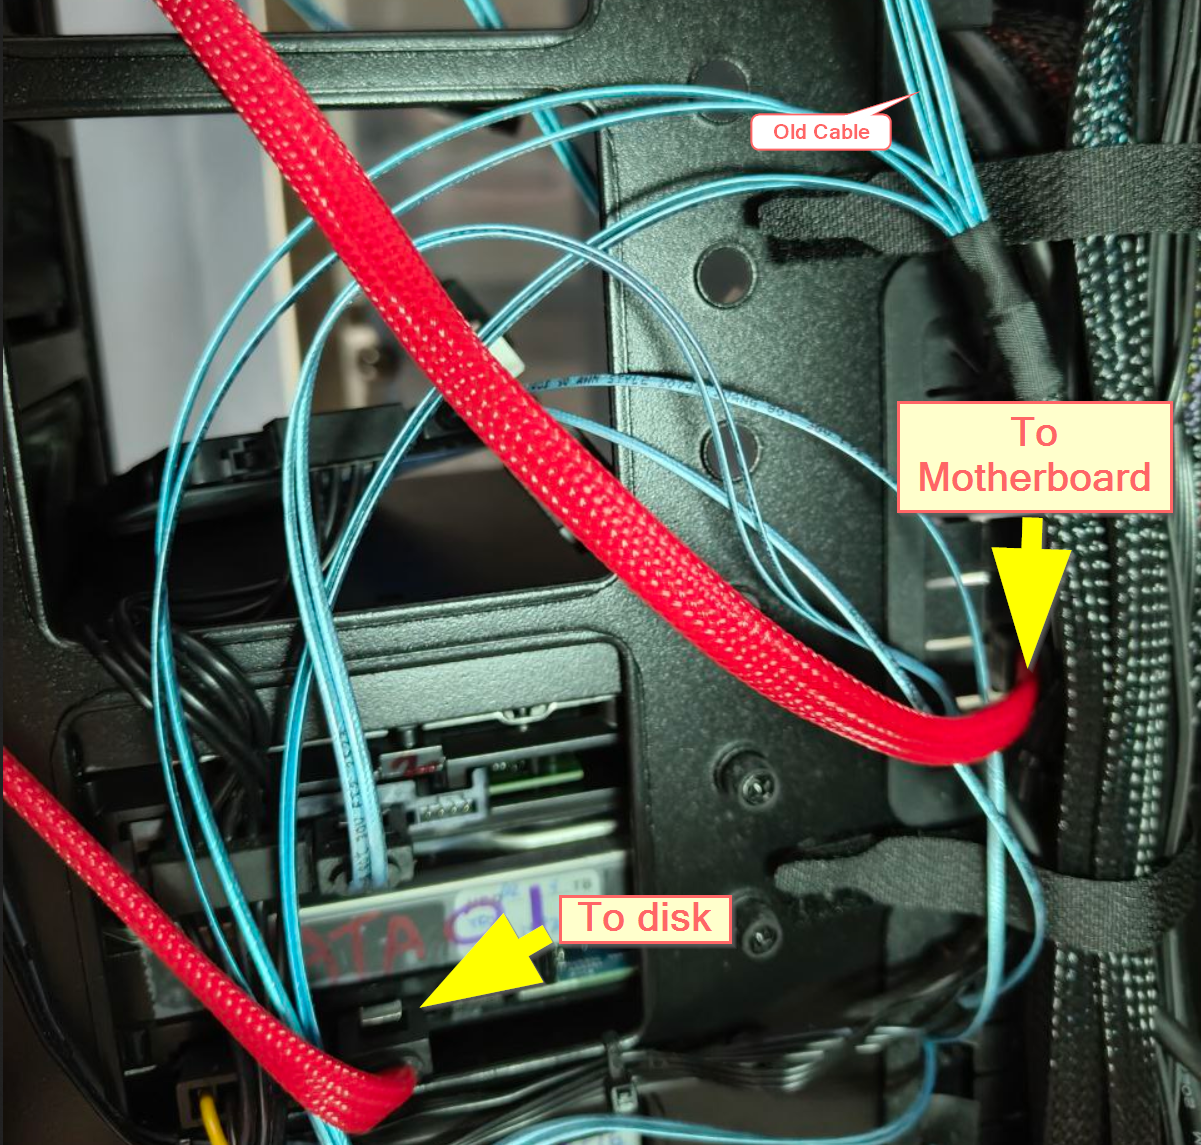
Next, I tried some hardware intervention. I stopped the VM and the server, replaced the SATA cable, and then restarted everything. Unfortunately, that didn’t resolve the issue.
Unmount Attempt
umount /dev/sdb1andumount /mnt/data01failed due to the device being busy.
Resource Usage Check
fuser -a /mnt/data01andlsof /mnt/data01failed to provide information due to I/O errors.
Hardware Intervention
- VM and server stopped.
- SATA cable replaced. Slim SATA data cable was previously used. I’ve replaced the slim blue SATA cable with a thicker red cable.
- Disk was previously attached to LSI HBA Card. Now I derectly attached it to a free SATA port on the motherboard.
- Server and VM restarted.
XFS Filesystem Repair and Bad Block Check
I decided to try repairing the XFS filesystem and checking for bad blocks on the disk. I ran xfs_repair -n /dev/sdb1 to assess the filesystem without making any modifications, and then I ran xfs_repair /dev/sdb1 to fix any detected issues. While that was running, I initiated a bad block check with badblocks -v -n /dev/sdb.
xfs_repair -n /dev/sdb1run to assess the filesystem without modifications.xfs_repair /dev/sdb1run to fix detected issues.badblocks -v -n /dev/sdbinitiated to check for bad blocks on the disk.
After an 8 hour wait, xfs_repair completed successfully. It took 7 hours and 48 minutes to run on the 4TB disk, but it managed to repair the filesystem. The badblocks scan also completed after 2 days and 4 hours, and thankfully, it didn’t find any bad blocks. This meant that the I/O errors were likely due to a filesystem corruption rather than a physical problem with the disk.
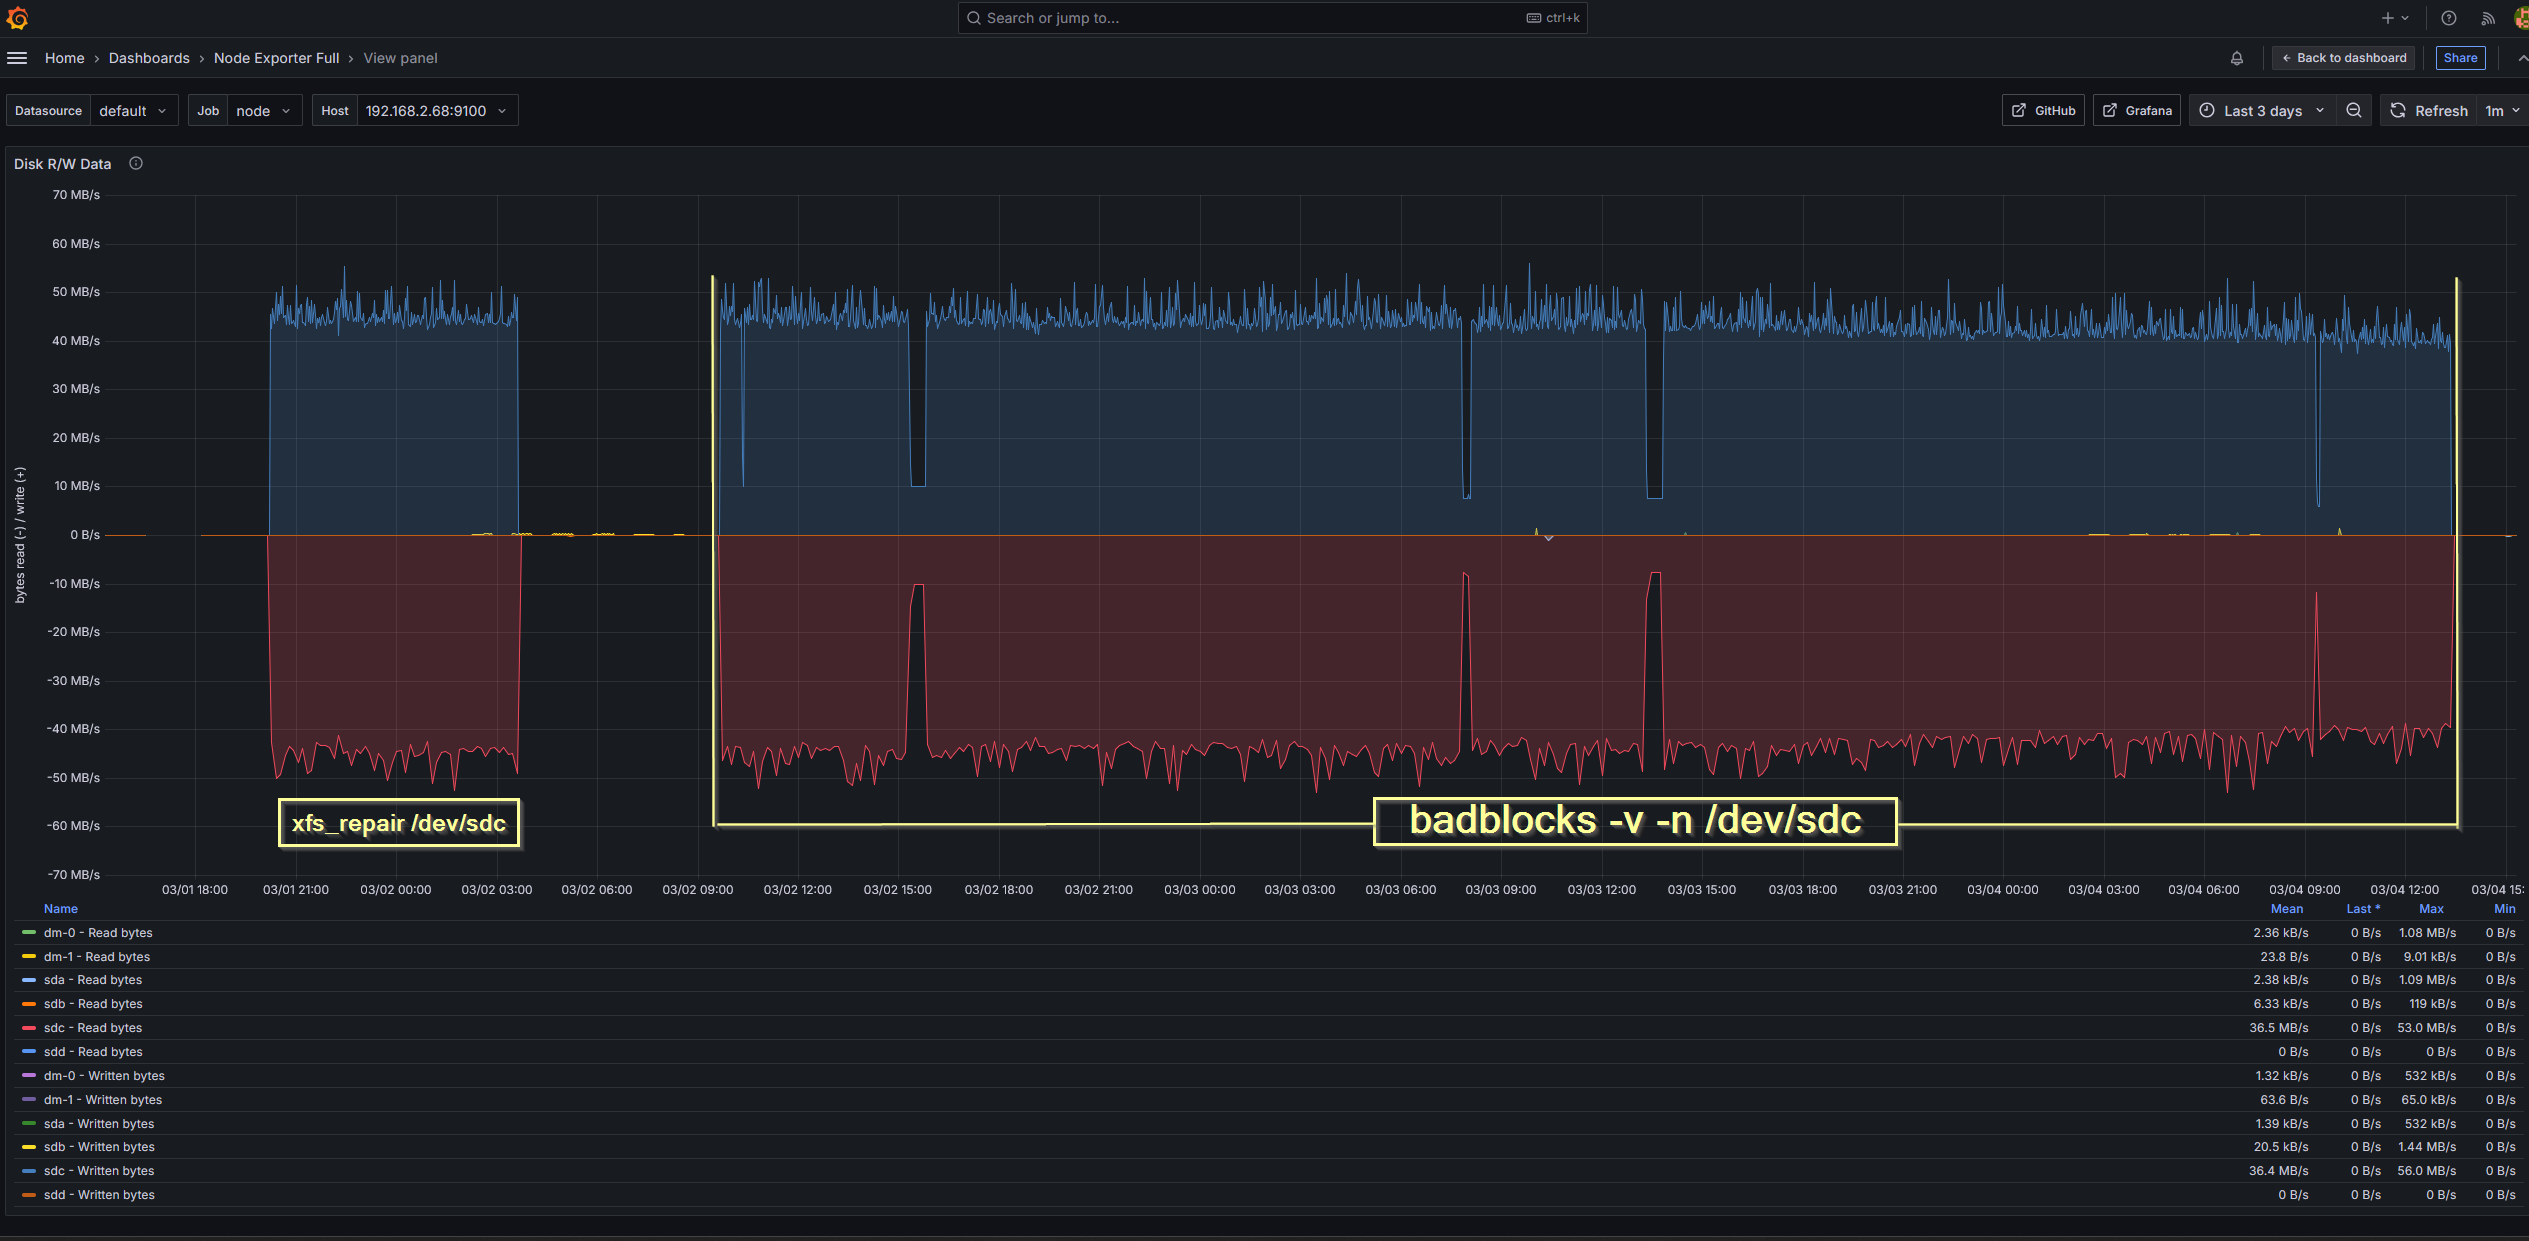
    [root@storage01 ~]# xfs_repair /dev/sdc1
    [root@storage01 ~]# xfs_repair /dev/sdc1
    Phase 1 - find and verify superblock...
    Phase 2 - using internal log
            - zero log...
            - scan filesystem freespace and inode maps...
            - found root inode chunk
    Phase 3 - for each AG...
            - scan and clear agi unlinked lists...
            - process known inodes and perform inode discovery...
            - agno = 0
            - agno = 1
            - agno = 2
            - agno = 3
            - process newly discovered inodes...
    Phase 4 - check for duplicate blocks...
            - setting up duplicate extent list...
            - check for inodes claiming duplicate blocks...
            - agno = 1
            - agno = 2
            - agno = 0
            - agno = 3
    clearing reflink flag on inodes when possible
    Phase 5 - rebuild AG headers and trees...
            - reset superblock...
    Phase 6 - check inode connectivity...
            - resetting contents of realtime bitmap and summary inodes
            - traversing filesystem ...
            - traversal finished ...
            - moving disconnected inodes to lost+found ...
    Phase 7 - verify and correct link counts...
    done

    [root@storage01 ~]# badblocks -v -n /dev/sdc
    Checking for bad blocks in non-destructive read-write mode
    From block 0 to 3907018583
    Testing with random pattern:
xfs_repair Phases
xfs_repair as shown above, operates in a series of distinct phases:
- 1 Find and Verify Superblock: Locates and checks the superblock, a critical structure holding filesystem metadata.
- 2 Using Internal Log: Utilizes the filesystem’s journal log to scan freespace and inode maps.
- 3 Process AGs: Scans and clears Allocation Group Information (AGI) unlinked lists and processes known inodes.
- 4 Check for Duplicate Blocks: Identifies duplicate blocks, which often indicate data corruption.
- 5 Rebuild AG Headers and Trees: Reconstructs AG headers and trees, vital for filesystem organization.
- 6 Check Inode Connectivity: Ensures all files and directories are correctly linked.
- 7 Verify and Correct Link Counts: Checks and modifies link counts, which track directory references to files.
It also offers a “no modify” mode, using the command xfs_repair -n /dev/sdc. This mode skips the actual repair phases and only detects filesystem corruption, giving a safe way to assess the damage without making changes.
In my case, the full xfs_repair command took 7 hours and 48 minutes to complete for the 4TB disk. Thankfully, the subsequent badblocks scan, which ran for 2 days, 4 hours, and 25 minutes, found no bad blocks, indicating that the I/O errors were likely due to filesystem corruption rather than a physical disk problem.
After the successful repair, I remounted the disk and ran a scrub, and everything is now back to normal.
        SCRUB finished [Tue Mar  4 11:56:11 PM +04 2025]
        ----------------------------------------
        Self test...
        Loading state from /mnt/data01/SnapRAID.content...
        Using 846 MiB of memory for the file-system.
        SnapRAID status report:

        Files Fragmented Excess  Wasted  Used    Free  Use Name
                Files  Fragments  GB      GB      GB
        554868      98     981   608.0    1867     841  69% d1
        541458     152     433   258.6    1500    1211  56% d2
        --------------------------------------------------------------------------
        1096326     250    1414   866.6    3367    2052  63%


        18%|                                               o
        |                                               *
        |                                               *
        |                                               *
        |                                               *
        |                                               *
        |                                               *
        9%|   o   o  o   o          o                     *  o                  o
        |   *   *  *   *      o   *                     *  *                  *
        |   *   *  *   *  o   *   *                     *  *                  *
        |   *   *  *   *  *   *   *                     *  *                  *
        |   *   *  *   *  *   *   *                     *  *                  *
        |   *   *  *   *  *   *   *                     *  *                  *
        |   *   *  *   *  *   *   *                     *  *                  *
        0%|*__*___*__*___*__*___*___*_____________________*__*__o_______________*
        19                    days ago of the last scrub/sync                 0

        The oldest block was scrubbed 19 days ago, the median 13, the newest 0.

        No sync is in progress.
        2% of the array is not scrubbed.
        You have 119 files with a zero sub-second timestamp.
        Run 'snapraid touch' to set their sub-second timestamps to a non-zero value.
        No rehash is in progress or needed.
        No error detected.
